Class Modifiers in Dart/Flutter. Build Apps like a Pro
Cover use cases from basic to advanced to learn how to build advanced and scalable Flutter Applications


Link for reading this article for free
Since we used Modifiers in previous sections of Learning Flutter in Fun Way, this is a full-fledged guide on using Class Modifiers. This will guide you in their definitions and how to use them in real-world scenarios.
When building Flutter apps, understanding class modifiers in Dart is crucial for writing clean, scalable, and maintainable code. Dart provides several class modifiers (abstract, base, final, sealed, interface, mixin, and mixin class) that help define how classes interact, inherit, and share functionality.
This article explores each modifier in-depth with real-world examples, highlighting their key differences and best use cases. Whether you’re creating reusable UI components, enforcing strict contracts, or improving code organization, mastering these modifiers will significantly enhance your Flutter development skills.
Class Modifiers, what are they?
In Flutter (Dart), class modifiers are keywords used to control how a class can be used, extended, instantiated, or mixed in. They define constraints on a class’s behavior and help enforce best practices in object-oriented programming.
Let’s start
Abstract Modifier
An abstract class in Dart is a class that cannot be instantiated directly. It serves as a blueprint for other classes, allowing you to define methods that subclasses must implement.
But Why Use Abstract Classes?
- To enforce a common structure across multiple classes.
- To define methods without implementation (abstract methods).
- To provide default implementations that subclasses can override.
Declaring an Abstract Class:
Use the abstract keyword before the class name.
abstract class Animal {
  void makeSound(); // Abstract method (no body)
}

class Dog extends Animal {
  @override
  void makeSound() {
    print("Bark!");
  }
}

void main() {
  // Animal a = Animal(); // ❌ Error: Cannot instantiate an abstract class
  Dog d = Dog(); // ✅ Allowed
  d.makeSound(); // Output: Bark!
}
Use Case: API Service Layer
In Flutter apps, we often interact with REST APIs. Using an abstract class helps define a standard for different API services.
abstract class ApiService {
  Future<Map<String, dynamic>> fetchData(String endpoint);
}

class HttpApiService extends ApiService {
  @override
  Future<Map<String, dynamic>> fetchData(String endpoint) async {
    // Simulating an API call
    print("Fetching data from $endpoint...");
    await Future.delayed(Duration(seconds: 2));
    return {"status": "success", "data": "Sample API Response"};
  }
}

void main() async {
  ApiService service = HttpApiService();
  var response = await service.fetchData("https://api.example.com/data");
  print(response);
}
Why Use an Abstract Class Here?
✅ Enforces that all API services must have a fetchData() method.
✅ Helps with dependency injection — e.g., switching from HttpApiService to a MockApiService for testing.
Abstract Class in Game Development
When creating a game, different characters (player, enemy, NPCs) might share common behaviors but have different actions.
abstract class GameCharacter {
  String name;

  GameCharacter(this.name);

  void attack(); // Abstract method

  void move() {
    print("$name is moving...");
  }
}

class Warrior extends GameCharacter {
  Warrior(String name) : super(name);

  @override
  void attack() {
    print("$name swings a sword!");
  }
}

class Archer extends GameCharacter {
  Archer(String name) : super(name);

  @override
  void attack() {
    print("$name shoots an arrow!");
  }
}

void main() {
  GameCharacter warrior = Warrior("Thor");
  GameCharacter archer = Archer("Legolas");

  warrior.move(); // Output: Thor is moving...
  warrior.attack(); // Output: Thor swings a sword!

  archer.move(); // Output: Legolas is moving...
  archer.attack(); // Output: Legolas shoots an arrow!
}
Why Use an Abstract Class Here?
✅ Ensures all characters have an attack() method.
✅ Allows code reusability (move() method is inherited).
✅ Makes it easy to add new character types without modifying existing ones.
Use Case: Factory Pattern
Abstract classes are commonly used in the Factory Design Pattern to create objects without specifying the exact class.
Example: Payment Processing System
abstract class PaymentProcessor {
  void processPayment(double amount);
}

class CreditCardPayment extends PaymentProcessor {
  @override
  void processPayment(double amount) {
    print("Processing credit card payment of ₹$amount");
  }
}

class UpiPayment extends PaymentProcessor {
  @override
  void processPayment(double amount) {
    print("Processing UPI payment of ₹$amount");
  }
}

// Factory Function
PaymentProcessor getPaymentProcessor(String type) {
  if (type == "credit_card") return CreditCardPayment();
  if (type == "upi") return UpiPayment();
  throw Exception("Invalid payment type");
}

void main() {
  PaymentProcessor payment = getPaymentProcessor("upi");
  payment.processPayment(500); // Output: Processing UPI payment of ₹500
}
Why Use an Abstract Class Here?
✅ Allows different payment methods while maintaining a consistent API
✅ Makes it easy to add new payment methods without modifying the existing system.
Use Case: Custom Button Styles
In a Flutter app, we can define a base class for different button styles.
import 'package:flutter/material.dart';

abstract class CustomButton extends StatelessWidget {
  final String label;
  final VoidCallback onPressed;

  CustomButton({required this.label, required this.onPressed});

  Widget buildButton(BuildContext context); // Abstract method

  @override
  Widget build(BuildContext context) {
    return buildButton(context);
  }
}

class PrimaryButton extends CustomButton {
  PrimaryButton({required String label, required VoidCallback onPressed})
      : super(label: label, onPressed: onPressed);

  @override
  Widget buildButton(BuildContext context) {
    return ElevatedButton(
      onPressed: onPressed,
      child: Text(label),
    );
  }
}

class SecondaryButton extends CustomButton {
  SecondaryButton({required String label, required VoidCallback onPressed})
      : super(label: label, onPressed: onPressed);

  @override
  Widget buildButton(BuildContext context) {
    return OutlinedButton(
      onPressed: onPressed,
      child: Text(label),
    );
  }
}

void main() {
  runApp(MaterialApp(
    home: Scaffold(
      body: Center(
        child: Column(
          mainAxisSize: MainAxisSize.min,
          children: [
            PrimaryButton(label: "Primary", onPressed: () => print("Clicked!")),
            SecondaryButton(label: "Secondary", onPressed: () => print("Clicked!")),
          ],
        ),
      ),
    ),
  ));
}
Why Use an Abstract Class Here?
✅ Enforces all buttons to have a buildButton() method.
✅ Keeps button logic consistent while allowing different styles.
✅ Improves code maintainability in large apps.
Extends Modifier
The extends keyword is used to create a subclass (child class) that inherits from a superclass (parent class). It allows code reuse by inheriting properties and methods from the parent class.
Why Use Inheritance (extends)?
✅ Code Reusability → Avoid rewriting common logic.
✅ Encapsulation → Keep related functionality together.
✅ Polymorphism → Modify or extend the behavior of inherited methods.
Use Case: A Base Screen Class
When developing a Flutter app, many screens share common UI elements like headers, backgrounds, or navigation.
import 'package:flutter/material.dart';

class BaseScreen extends StatelessWidget {
  final String title;
  final Widget body;

  BaseScreen({required this.title, required this.body});

  @override
  Widget build(BuildContext context) {
    return Scaffold(
      appBar: AppBar(title: Text(title)),
      body: body,
    );
  }
}

class HomeScreen extends BaseScreen {
  HomeScreen()
      : super(
          title: "Home",
          body: Center(child: Text("Welcome Home!")),
        );
}

void main() {
  runApp(MaterialApp(home: HomeScreen()));
}
Why Use extends Here?
✅ Avoids repeating Scaffold setup on every screen.
✅ Makes it easy to add new screens.
Use Case: Different Types of Game Characters
Every character in a game might have different behavior but share some common properties.
class Character {
  String name;
  int health;

  Character(this.name, this.health);

  void attack() {
    print("$name attacks!");
  }
}

class Player extends Character {
  int experience = 0;

  Player(String name, int health) : super(name, health);

  void gainXP(int xp) {
    experience += xp;
    print("$name gained $xp XP! Total XP: $experience");
  }
}

class Enemy extends Character {
  Enemy(String name, int health) : super(name, health);

  @override
  void attack() {
    print("$name (Enemy) attacks fiercely!");
  }
}

void main() {
  Player player = Player("Hero", 100);
  player.attack();
  player.gainXP(50);

  Enemy enemy = Enemy("Goblin", 50);
  enemy.attack();
}
Why Use extends Here?
✅ Player and Enemy share common properties but can override behaviors.
✅ We override the attack() method for the enemy.
Use Case: Singleton Pattern (Extending a Base Singleton Class)
When implementing Singleton classes in Dart, a base class can be extended to ensure proper instance handling.
class Singleton {
  static final Singleton _instance = Singleton._internal();

  factory Singleton() {
    return _instance;
  }

  Singleton._internal();
}

class Logger extends Singleton {
  void log(String message) {
    print("LOG: $message");
  }
}

void main() {
  Logger logger1 = Logger();
  Logger logger2 = Logger();

  print(logger1 == logger2); // Output: true (same instance)
  logger1.log("Application started");
}
Why Use extends Here?
✅ Prevents multiple instances of the Logger.
✅ Helps follow the Singleton Design Pattern.
Use Case: Custom Themed Widgets
Flutter allows theming widgets using extends to create pre-styled components.
import 'package:flutter/material.dart';

class CustomButton extends StatelessWidget {
  final String text;
  final VoidCallback onPressed;
  final Color color;

  CustomButton({required this.text, required this.onPressed, this.color = Colors.blue});

  @override
  Widget build(BuildContext context) {
    return ElevatedButton(
      style: ElevatedButton.styleFrom(backgroundColor: color),
      onPressed: onPressed,
      child: Text(text),
    );
  }
}

class DangerButton extends CustomButton {
  DangerButton({required String text, required VoidCallback onPressed})
      : super(text: text, onPressed: onPressed, color: Colors.red);
}

void main() {
  runApp(MaterialApp(
    home: Scaffold(
      body: Center(
        child: DangerButton(
          text: "Delete",
          onPressed: () => print("Danger!"),
        ),
      ),
    ),
  ));
}
Why Use extends Here?
✅ Keeps UI consistent across different button types.
✅ Easily customizes styles by overriding properties.
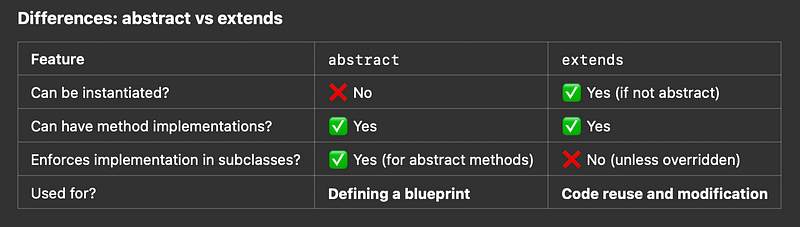
For finality, let’s finish this off with a difference table between abstract and extends
Implements Modifier
The implements keyword is used when a class wants to enforce a structure by implementing an interface but does not inherit any behavior from it. Unlike extends, implements requires the class to provide its own implementations for all methods and properties of the interface.
Why Use Implements?
✅ Enforces consistency across multiple classes.
✅ Encourages loose coupling by separating interface from implementation.
✅ Allows multiple interface implementations, unlike extends (which supports only single inheritance).
Use Case: Repository Pattern
abstract class UserRepository {
  Future<String> fetchUserData();
}

class RemoteUserRepository implements UserRepository {
  @override
  Future<String> fetchUserData() async {
    return "User data from API";
  }
}

class LocalUserRepository implements UserRepository {
  @override
  Future<String> fetchUserData() async {
    return "User data from local database";
  }
}

void main() async {
  UserRepository repo = RemoteUserRepository();
  print(await repo.fetchUserData()); // Output: User data from API

  repo = LocalUserRepository();
  print(await repo.fetchUserData()); // Output: User data from local database
}
Why Use Implements Here?
✅ Allows switching between remote and local data without modifying code.
✅ Follows the Repository Pattern, making the app more scalable.
Use Case: Defining Player Controls
In a game, different characters may have different controls but should follow a common interface.
abstract class Movable {
  void move();
}

class Player implements Movable {
  @override
  void move() {
    print("Player moves with arrow keys");
  }
}

class NPC implements Movable {
  @override
  void move() {
    print("NPC moves using AI pathfinding");
  }
}

void main() {
  Movable player = Player();
  player.move(); // Output: Player moves with arrow keys

  Movable npc = NPC();
  npc.move(); // Output: NPC moves using AI pathfinding
}
Why Use Implements Here?
✅ Ensures all characters have a move() method.
✅ Allows different movement strategies (manual vs AI).
Use Case: Mocking API Calls for Testing
When writing tests, we need to replace real API calls with mock data.
abstract class ApiService {
  Future<String> fetchData();
}

class RealApiService implements ApiService {
  @override
  Future<String> fetchData() async {
    return "Real API Data";
  }
}

class MockApiService implements ApiService {
  @override
  Future<String> fetchData() async {
    return "Mocked API Data";
  }
}

void main() async {
  ApiService service = MockApiService();
  print(await service.fetchData()); // Output: Mocked API Data
}
Why Use Implements Here?
✅ Allows testing without real API calls.
✅ Makes it easy to swap real and mock services.
Use Case: Custom Button Behaviors
Flutter allows us to enforce button behavior across multiple components.
abstract class Clickable {
  void onClick();
}

class NormalButton implements Clickable {
  @override
  void onClick() {
    print("Normal Button Clicked");
  }
}

class DangerButton implements Clickable {
  @override
  void onClick() {
    print("Danger Button Clicked! Are you sure?");
  }
}

void main() {
  Clickable button = NormalButton();
  button.onClick(); // Output: Normal Button Clicked

  button = DangerButton();
  button.onClick(); // Output: Danger Button Clicked! Are you sure?
}
Why Use Implements Here?
✅ Ensures all buttons have onClick() behavior.
✅ Allows custom behavior per button type.
Use Case: Multiple Interface Implementation
Dart does not support multiple inheritance (extends allows only one superclass), but implements allows multiple interfaces.
abstract class CanDrive {
  void drive();
}

abstract class CanCook {
  void cook();
}

class Person implements CanDrive, CanCook {
  @override
  void drive() {
    print("Driving a car");
  }

  @override
  void cook() {
    print("Cooking pasta");
  }
}

void main() {
  Person person = Person();
  person.drive(); // Output: Driving a car
  person.cook();  // Output: Cooking pasta
}
Why Use Implements Here?
✅ Allows multiple roles (a person can both drive and cook).
✅ Keeps logic separate by defining each role in a different interface.
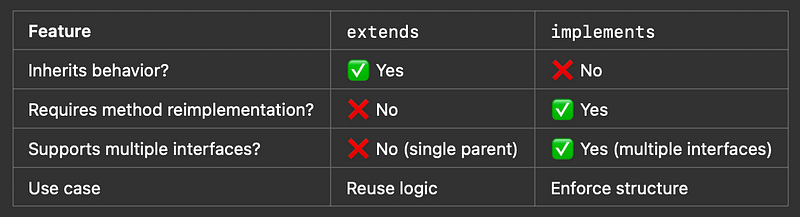
And now that we’re done with all the use cases for this modifier, here are the key differences:
With Modifier
The with keyword is used to add behavior to a class without using inheritance (extends).
Why Use Mixins?
✅ Code Reusability — Avoids duplicate code across classes.
✅ Multiple Behaviors — Unlike extends, you can use multiple mixins.
✅ No Need for Abstract Classes — Helps in defining reusable behavior without enforcing structure.
Let’s start with a very basic example
mixin CanRun {
  void run() => print("Running fast...");
}

class Dog with CanRun {}

void main() {
  Dog dog = Dog();
  dog.run(); // Output: Running fast...
}
Key Takeaways:
1. CanRun is a mixin, not an interface or class.
2. Dog gains run() without using extends.
3. You can add multiple mixins!
This all looks very plain. Let’s understand with some real world usescases.
Use Case: Logging and Error Handling
Logging behavior is often reused across services.
mixin Logger {
  void log(String message) {
    print("LOG: $message");
  }
}

class NetworkService with Logger {
  void fetchData() {
    log("Fetching data from server...");
  }
}

void main() {
  NetworkService service = NetworkService();
  service.fetchData(); // LOG: Fetching data from server...
}
Why Use Mixins Here?
✅ Keeps logging separate from core functionality.
✅ Reuses logging across multiple services (e.g., DatabaseService with Logger).
Use Case: Reusable Abilities in Game Development
Characters in a game may share abilities.
mixin CanJump {
  void jump() => print("Jumping...");
}

mixin CanFly {
  void fly() => print("Flying...");
}

class Player with CanJump, CanFly {}

void main() {
  Player player = Player();
  player.jump(); // Output: Jumping...
  player.fly();  // Output: Flying...
}
Use Case: Reusable State Behaviors
When using Bloc, Provider, or Riverpod, mixins help reuse state logic.
mixin LoadingState {
  bool isLoading = false;

  void startLoading() {
    isLoading = true;
    print("Loading started...");
  }

  void stopLoading() {
    isLoading = false;
    print("Loading finished...");
  }
}

class ApiBloc with LoadingState {
  void fetchData() {
    startLoading();
    print("Fetching data...");
    stopLoading();
  }
}

void main() {
  ApiBloc bloc = ApiBloc();
  bloc.fetchData();
  // Output:
  // Loading started...
  // Fetching data...
  // Loading finished...
}
Why Use Mixins Here?
✅ Reduces duplicate code in different Bloc classes.
✅ Easily add loading state to multiple state managers.
Use Case: Reusable Animation Behavior
Flutter animations often require the same logic.
import 'package:flutter/material.dart';

mixin AnimationHandler<T extends StatefulWidget> on State<T>, TickerProviderStateMixin {
  late AnimationController animationController;

  @override
  void initState() {
    super.initState();
    animationController = AnimationController(
      vsync: this,
      duration: Duration(seconds: 2),
    )..repeat(reverse: true);
  }

  @override
  void dispose() {
    animationController.dispose();
    super.dispose();
  }
}

class AnimatedBox extends StatefulWidget {
  @override
  _AnimatedBoxState createState() => _AnimatedBoxState();
}

class _AnimatedBoxState extends State<AnimatedBox> with AnimationHandler {
  @override
  Widget build(BuildContext context) {
    return AnimatedBuilder(
      animation: animationController,
      builder: (context, child) {
        return Transform.scale(
          scale: 1 + (animationController.value * 0.5),
          child: Container(width: 100, height: 100, color: Colors.blue),
        );
      },
    );
  }
}

void main() => runApp(MaterialApp(home: Scaffold(body: Center(child: AnimatedBox()))));
Why with is used?
✅ Makes animation reusable across multiple widgets.
✅ Manages lifecycle of animation controllers.
Use Case: Caching API Calls (Mixin for Data Persistence)
A mixin that caches API responses to avoid redundant network calls.
mixin CacheManager {
  final Map<String, dynamic> _cache = {};

  void storeInCache(String key, dynamic value) {
    _cache[key] = value;
  }

  dynamic getFromCache(String key) {
    return _cache[key];
  }

  bool isCached(String key) {
    return _cache.containsKey(key);
  }
}

class ApiService with CacheManager {
  Future<String> fetchData(String url) async {
    if (isCached(url)) {
      print("Fetching from cache...");
      return getFromCache(url);
    } else {
      print("Fetching from network...");
      await Future.delayed(Duration(seconds: 2)); // Simulating network delay
      String data = "Response from $url";
      storeInCache(url, data);
      return data;
    }
  }
}

void main() async {
  ApiService api = ApiService();

  print(await api.fetchData("https://api.example.com/data")); // Fetching from network
  print(await api.fetchData("https://api.example.com/data")); // Fetching from cache
}
Why use with here?
✅ Avoids redundant API calls (efficient network handling).
✅ Works as a plug-and-play caching system for any service.
Use Case: Permission handling in Mobile Apps
A mixin that checks for permissions before executing actions.
mixin PermissionHandler {
  bool checkPermission(String permission) {
    // Simulating permission check
    print("Checking permission for: $permission");
    return true; // Assume permission granted
  }

  void requestPermission(String permission) {
    print("Requesting permission for: $permission");
  }
}

class FileManager with PermissionHandler {
  void readFile() {
    if (checkPermission("storage")) {
      print("Reading file...");
    } else {
      requestPermission("storage");
    }
  }
}

void main() {
  FileManager fileManager = FileManager();
  fileManager.readFile(); // Output: Checking permission for: storage, Reading file...
}
Why use with here?
✅ Can be applied to multiple features (camera, location, storage).
✅ Prevents permission-related crashes.
And now that we’re done with all the use cases for this modifier, here are the key differences:
Base Modifier
The base modifier in Dart is used to restrict where a class can be extended while still allowing it to be implemented. This is particularly useful when designing frameworks, libraries, or enforcing specific inheritance rules. A base class can only be extended by other classes inside the same library. However, it cannot be implemented outside the library.
Why Use It?
- Prevents unintended extensions outside a package/library.
- Maintains control over inheritance rules while still allowing controlled usage
Use Case — Enforcing Internal Inheritance in SDKs
Imagine you are building a payment processing SDK and you want to ensure that only internal SDK classes can extend the base class.
// payments.dart (inside SDK library)
base class PaymentProcessor {
  void processPayment(double amount) {
    print("Processing payment of \$${amount}");
  }
}

// Can extend inside the same library
class CreditCardPayment extends PaymentProcessor {
  void authorize() => print("Authorizing credit card payment...");
}

// Cannot be extended outside this library
Why This Matters?
✅ Prevents external developers from extending PaymentProcessor.
✅ Ensures internal control over the payment flow.
What Happens If You Try to Extend base Outside?
import 'package:payments.dart';

class FraudulentPayment extends PaymentProcessor {
  void hackSystem() => print("Unauthorized access!");
}
❌ ERROR:
The class 'PaymentProcessor' can't be extended outside of its library.Let’s cover another Advanced Real-World Example of base in Dart 🚀
Scenario: Building a Secure Authentication System
Imagine you’re developing a user authentication system for an enterprise app. You want to:
✅ Provide a base class for authentication strategies (OAuth, JWT, API Key, etc.)
✅ Ensure only internal classes can extend the base authentication logic
✅ Prevent external modification to maintain security and consistency
Step 1: Define the base Authentication Class
// auth.dart (inside library)
base class AuthStrategy {
  final String user;

  AuthStrategy(this.user);

  // Must be overridden by subclasses
  void authenticate();
}
🔹 What this does:
• The AuthStrategy class is a base class, so only classes inside this library can extend it.
- It provides a secure foundation for authentication methods.
- It forces subclasses to implement the authenticate() method.
Step 2: Create Secure Internal Authentication Methods
// Still inside auth.dart

class OAuthAuth extends AuthStrategy {
  OAuthAuth(String user) : super(user);

  @override
  void authenticate() {
    print("Authenticating $user via OAuth...");
    // OAuth authentication logic here
  }
}

class JWTAuth extends AuthStrategy {
  JWTAuth(String user) : super(user);

  @override
  void authenticate() {
    print("Authenticating $user via JWT...");
    // JWT token verification logic here
  }
}
🔹 What this does:
✅ OAuthAuth and JWTAuth can extend AuthStrategy because they are inside the same library.
❌ External code cannot extend AuthStrategy, ensuring security.
Step 3: Trying to Extend AuthStrategy in Another Library (Fails)
Imagine a developer outside your library tries to create a custom authentication method.
// main.dart (outside the auth library)
import 'package:auth/auth.dart';

class CustomAuth extends AuthStrategy { // ❌ ERROR
  CustomAuth(String user) : super(user);

  @override
  void authenticate() {
    print("Custom authentication for $user");
  }
}
🚨 Dart Compiler Error:
The class 'AuthStrategy' can't be extended outside of its library.🔹 Why is this good?
✅ Protects against unauthorized modifications.
✅ Ensures all authentication methods follow a secure structure.
✅ Prevents security vulnerabilities by blocking custom implementations.
Step 4: Allowing External Implementation but Preventing Extension
If you want to allow external devs to implement AuthStrategy but not extend it, use an interface.
interface class AuthStrategy {
  void authenticate();
}
🔹 Now, external developers can implement AuthStrategy, but they cannot extend it.
And now that we’re done with all the use cases for this modifier, here are the key differences:

Final Modifier
A final class cannot be extended (no subclasses) but can be implemented (used as an interface).
Basic Example of final
final class Logger {
  void log(String message) => print("LOG: $message");
}

// This is NOT allowed ❌
class FileLogger extends Logger {} // ERROR!

// This is ALLOWED ✅
class CustomLogger implements Logger {
  @override
  void log(String message) => print("Custom log: $message");
}
🔹 Key Takeaways:
✅ Logger cannot be extended.
✅ Logger can be implemented.
Real-World Use Case — Preventing Unwanted Inheritance
Imagine you’re building a database SDK and you don’t want developers to subclass your DatabaseConnector but still allow them to implement their own versions.
// database.dart
final class DatabaseConnector {
  void connect() => print("Connected to database");
}

// ❌ ERROR: Cannot extend
class MySQLConnector extends DatabaseConnector {}

// ✅ Allowed: Can implement
class CustomDatabase implements DatabaseConnector {
  @override
  void connect() => print("Connecting to a custom database...");
}
🔹 Why This Matters?
✅ Prevents accidental subclassing that could break core logic.
✅ Still allows custom implementations for flexibility.
What Happens If You Try to Extend final?
final class PaymentProcessor {}

class CreditCardPayment extends PaymentProcessor {}
// ❌ ERROR! The class 'PaymentProcessor' can't be extended.
Why? Because Dart blocks inheritance to ensure PaymentProcessor remains unchanged and secure.
Use Case: Handling API Responses in a Network Layer
Imagine you’re building a networking module in a Flutter app that communicates with an API. You want to:
✅ Prevent developers from extending the ApiResponse class to maintain consistency.
✅ Allow different implementations to handle various response types (Success, Error, Loading).
✅ Ensure that response handling follows a strict structure without modifications.
Step 1: Define the final API Response Class
final class ApiResponse {
  final int statusCode;
  final String message;

  ApiResponse(this.statusCode, this.message);
}
🔹 What this does:
- final ensures that no one can extend ApiResponse, keeping the response structure secure.
- Developers must use it as is or implement their own version if needed.
Step 2: Allowing Custom Implementations (Without Extending)
Developers may want to customize how responses are handled, but they shouldn’t modify ApiResponse itself.
class SuccessResponse implements ApiResponse {
  @override
  final int statusCode;
  @override
  final String message;
  final dynamic data;

  SuccessResponse(this.statusCode, this.message, this.data);
}

class ErrorResponse implements ApiResponse {
  @override
  final int statusCode;
  @override
  final String message;
  final String errorDetails;

  ErrorResponse(this.statusCode, this.message, this.errorDetails);
}
🔹 Why this approach?
✅ Developers cannot subclass ApiResponse, ensuring its integrity.
✅ They can still implement ApiResponse to customize behavior.
Step 3: Using final to Prevent Unauthorized Inheritance
Now, let’s see what happens if a developer tries to extend ApiResponse:
class CustomResponse extends ApiResponse { // ❌ ERROR! The class 'ApiResponse' can't be extended.
  CustomResponse(int statusCode, String message) : super(statusCode, message);
}
🔹 Why is this useful?
✅ Prevents unintended modifications to ApiResponse.
✅ Ensures all response handling follows a consistent and secure format.
Step 4: How This Helps in a Flutter App
Now, let’s say we have an API service that returns different responses:
ApiResponse fetchUserData() {
  // Simulating API call
  return SuccessResponse(200, "User data retrieved", {"name": "John Doe"});
}

void handleApiResponse(ApiResponse response) {
  if (response is SuccessResponse) {
    print("✅ Success: ${response.message}, Data: ${response.data}");
  } else if (response is ErrorResponse) {
    print("❌ Error: ${response.message}, Details: ${response.errorDetails}");
  }
}

void main() {
  var response = fetchUserData();
  handleApiResponse(response); ✅ Success: User data retrieved, Data: {name: John Doe}
}
Sealed Modifier
The sealed modifier ensures that all subclasses of a class are defined within the same library. This is useful for exhaustive pattern matching in switch statements and enforcing a closed hierarchy. A sealed class cannot be instantiated and cannot be extended outside its library. However, it must have subclasses inside the same library.
🔹 Why Use It?
- Ensures all subclasses of a class are defined in one place.
- Enables exhaustive pattern matching in switch statements.
- Prevents unintended subclassing outside the library.
Basic Example of sealed
sealed class PaymentStatus {}

// All subclasses must be in the same library
class Success extends PaymentStatus {}
class Failure extends PaymentStatus {}
class Pending extends PaymentStatus {}

// ✅ Exhaustive switch case works!
void checkPayment(PaymentStatus status) {
  switch (status) {
    case Success():
      print("Payment Successful!");
    case Failure():
      print("Payment Failed!");
    case Pending():
      print("Payment Pending...");
  }
}
Key Takeaways:
✅ sealed forces subclasses to be in the same library.
✅ switch statements can be exhaustive, ensuring all cases are handled.
Use Case : Bank Transaction System
Imagine you’re building a banking system where transactions can be of different types:
- Deposit (Adding money to an account)
- Withdrawal (Taking money out)
- Transfer (Moving money between accounts)
Each type of transaction has different properties, but we want all transaction types to be defined in one place to maintain consistency.
sealed class BankTransaction {
  final double amount;
  final DateTime date;

  BankTransaction(this.amount, this.date);
}
What this does:
- sealed ensures that all transaction types remain inside the same library.
- Prevents external inheritance, keeping control over the transaction structure.
Step 2: Define Transaction Subclasses
class Deposit extends BankTransaction {
  final String accountNumber;

  Deposit(double amount, DateTime date, this.accountNumber)
      : super(amount, date);
}

class Withdrawal extends BankTransaction {
  final String atmLocation;

  Withdrawal(double amount, DateTime date, this.atmLocation)
      : super(amount, date);
}

class Transfer extends BankTransaction {
  final String fromAccount;
  final String toAccount;

  Transfer(double amount, DateTime date, this.fromAccount, this.toAccount)
      : super(amount, date);
}
Key Takeaways:
- These subclasses must stay in the same library as BankTransaction.
- No external code can extend BankTransaction.
Step 3: Using Pattern Matching for Secure Processing
void processTransaction(BankTransaction transaction) {
  switch (transaction) {
    case Deposit():
      print("💰 Deposit of \$${transaction.amount} into account ${transaction.accountNumber}");
    case Withdrawal():
      print("🏧 Withdrawal of \$${transaction.amount} from ATM at ${transaction.atmLocation}");
    case Transfer():
      print("🔄 Transfer of \$${transaction.amount} from ${transaction.fromAccount} to ${transaction.toAccount}");
  }
}
Step 4: Using the sealed Transactions in the Banking System
void main() {
  BankTransaction t1 = Deposit(500.0, DateTime.now(), "123456789");
  BankTransaction t2 = Withdrawal(100.0, DateTime.now(), "Downtown ATM");
  BankTransaction t3 = Transfer(250.0, DateTime.now(), "123456789", "987654321");

  processTransaction(t1);
  processTransaction(t2);
  processTransaction(t3);
}
Interface modifier
The interface modifier forces a class to be only implemented, not extended. This means:
- The class cannot be subclassed.
- Any class that implements an interface class must provide its own implementation for all methods and properties.
Why Use interface?
- Enforces strict contracts without inheritance.
- Encourages composition over inheritance.
- Provides maximum flexibility while maintaining consistency.
Let’s start with a basic example:
interface class Animal {
  void makeSound();
}

class Dog implements Animal {
  @override
  void makeSound() {
    print("Bark!");
  }
}

class Cat implements Animal {
  @override
  void makeSound() {
    print("Meow!");
  }
}

void main() {
  Dog dog = Dog();
  dog.makeSound(); // Bark!

  Cat cat = Cat();
  cat.makeSound(); // Meow!
}
Key Takeaways:
- Dog and Cat must implement makeSound().
- Neither can extend Animal.
Use Case — Payment Gateway
Imagine you’re building an app with different payment methods like:
- UPI
- Credit Card
- Cash on Delivery
Step 1: Define the interface Class
interface class PaymentMethod {
  void processPayment(double amount);
}
Step 2: Implement Different Payment Methods
class UpiPayment implements PaymentMethod {
  @override
  void processPayment(double amount) {
    print("Processing UPI payment of ₹$amount");
  }
}

class CreditCardPayment implements PaymentMethod {
  @override
  void processPayment(double amount) {
    print("Processing Credit Card payment of ₹$amount");
  }
}

class CashOnDelivery implements PaymentMethod {
  @override
  void processPayment(double amount) {
    print("Payment of ₹$amount will be collected at delivery");
  }
}
Step 3: Using Payment Methods
void checkout(PaymentMethod payment, double amount) {
  payment.processPayment(amount);
}

void main() {
  checkout(UpiPayment(), 500.0);        // Processing UPI payment of ₹500.0
  checkout(CreditCardPayment(), 1000.0); // Processing Credit Card payment of ₹1000.0
  checkout(CashOnDelivery(), 700.0);    // Payment of ₹700.0 will be collected at delivery
}
Why Use interface Here?
- Guarantees that all payment methods follow the same contract.
- Allows adding new payment methods without changing existing code (Open/Closed Principle).
Use interface when you want to:
- Define strict contracts without inheritance.
- Allow custom implementations.
- Encourage composition over inheritance.
Mixin Modifier
A mixin class allows a class to be both used as a mixin and instantiated as a normal class.
Key Features:
- Can be mixed into other classes.
- Can also be instantiated directly.
- Provides code reusability without inheritance.
Let’s start off with a basic example:
mixin class Logger {
  void log(String message) {
    print("LOG: $message");
  }
}

class FileStorage with Logger {
  void saveData() {
    log("Saving data to file...");
  }
}

void main() {
  FileStorage storage = FileStorage();
  storage.saveData();  // LOG: Saving data to file...

  Logger logger = Logger(); // ✅ Allowed
  logger.log("Standalone logger works!");
}
Key Takeaways:
- Logger can be mixed into other classes.
- Logger can also be instantiated as an object.
Scenario: Wearable Devices with Shared Features
Imagine a system for wearable devices like smartwatches and fitness bands.
- Both devices track steps and monitor heart rate.
- They also have unique features.
Step 1: Create a mixin class for Shared Features
mixin class HealthTracker {
  int steps = 0;
  int heartRate = 72;

  void trackSteps() {
    steps += 100; // Simulating step tracking
    print("Total steps: $steps");
  }

  void monitorHeartRate() {
    print("Current heart rate: $heartRate bpm");
  }
}
Step 2: Use mixin class in Smartwatch and FitnessBand
class Smartwatch with HealthTracker {
  void showNotifications() {
    print("📩 New notification received.");
  }
}

class FitnessBand with HealthTracker {
  void syncWithPhone() {
    print("🔄 Syncing fitness data with phone...");
  }
}
Step 3: Using the Wearable Devices
void main() {
  Smartwatch watch = Smartwatch();
  watch.trackSteps();       // Total steps: 100
  watch.monitorHeartRate(); // Current heart rate: 72 bpm
  watch.showNotifications(); // 📩 New notification received.

  FitnessBand band = FitnessBand();
  band.trackSteps();       // Total steps: 100
  band.monitorHeartRate(); // Current heart rate: 72 bpm
  band.syncWithPhone();    // 🔄 Syncing fitness data with phone...

  HealthTracker tracker = HealthTracker(); // ✅ Instantiation allowed
  tracker.trackSteps(); // Total steps: 100
}
Use Case: Creating a Reusable “Bouncing Button” Effect
Imagine we want multiple buttons in our app that have a bouncing animation when pressed. Instead of rewriting the animation logic in every widget, we can use a mixin to handle it!
Step 1: Create a BouncingEffect Mixin
This mixin will handle animation using SingleTickerProviderStateMixin and AnimationController.
import 'package:flutter/material.dart';

mixin BouncingEffect on StatefulWidget {
  @override
  _BouncingEffectState createState() => _BouncingEffectState();
}

class _BouncingEffectState<T extends StatefulWidget> extends State<T>
    with SingleTickerProviderStateMixin {
  late AnimationController _controller;
  late Animation<double> _scaleAnimation;

  @override
  void initState() {
    super.initState();
    _controller = AnimationController(
      vsync: this,
      duration: const Duration(milliseconds: 200),
      lowerBound: 0.9,
      upperBound: 1.0,
    );
    _scaleAnimation = _controller.drive(CurveTween(curve: Curves.easeInOut));
  }

  void _onTapDown(TapDownDetails details) => _controller.reverse();
  void _onTapUp(TapUpDetails details) => _controller.forward();
  void _onTapCancel() => _controller.forward();

  @override
  Widget build(BuildContext context) {
    return GestureDetector(
      onTapDown: _onTapDown,
      onTapUp: _onTapUp,
      onTapCancel: _onTapCancel,
      child: ScaleTransition(
        scale: _scaleAnimation,
        child: buildChild(),
      ),
    );
  }

  Widget buildChild(); // This will be implemented in subclasses

  @override
  void dispose() {
    _controller.dispose();
    super.dispose();
  }
}
Step 2: Create a Custom Button that Uses the Mixin
Now we create a BouncingButton that mixes in the BouncingEffect behavior.
class BouncingButton extends StatefulWidget with BouncingEffect {
  final VoidCallback onPressed;
  final Widget child;

  BouncingButton({required this.onPressed, required this.child});

  @override
  _BouncingButtonState createState() => _BouncingButtonState();
}

class _BouncingButtonState extends _BouncingEffectState<BouncingButton> {
  @override
  Widget buildChild() {
    return ElevatedButton(
      onPressed: widget.onPressed,
      child: widget.child,
      style: ElevatedButton.styleFrom(
        shape: RoundedRectangleBorder(
          borderRadius: BorderRadius.circular(10),
        ),
        padding: const EdgeInsets.symmetric(horizontal: 24, vertical: 12),
      ),
    );
  }
}
Use the BouncingButton in Your UI
void main() {
  runApp(MaterialApp(home: BouncingButtonExample()));
}

class BouncingButtonExample extends StatelessWidget {
  @override
  Widget build(BuildContext context) {
    return Scaffold(
      appBar: AppBar(title: Text("Mixin-Based UI Animation")),
      body: Center(
        child: BouncingButton(
          onPressed: () => print("Button Pressed!"),
          child: Text("Click Me"),
        ),
      ),
    );
  }
}
Why Use a mixin Here?
- Code Reusability — We can reuse BouncingEffect in multiple buttons without copying animation logic.
- Separation of Concerns — UI components remain clean and focus only on their unique styling/behavior.
- Extensibility — If we want different types of buttons with the same bounce effect (e.g., OutlinedButton, IconButton), we can reuse the mixin.
Bonus: Reusing the Same Mixin for a Bouncing Icon
Want a bouncing icon? Reuse the mixin:
class BouncingIcon extends StatefulWidget with BouncingEffect {
  final IconData icon;
  final VoidCallback onPressed;

  BouncingIcon({required this.icon, required this.onPressed});

  @override
  _BouncingIconState createState() => _BouncingIconState();
}

class _BouncingIconState extends _BouncingEffectState<BouncingIcon> {
  @override
  Widget buildChild() {
    return IconButton(
      icon: Icon(widget.icon, size: 32),
      onPressed: widget.onPressed,
    );
  }
}
Using BouncingIcon in UI
BouncingIcon(
icon: Icons.favorite,
onPressed: () => print("Icon Pressed!"),
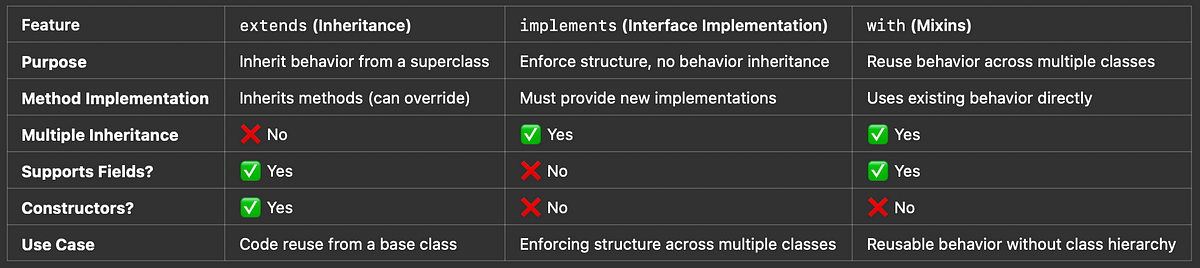
)Here are key differences between different modifiers:
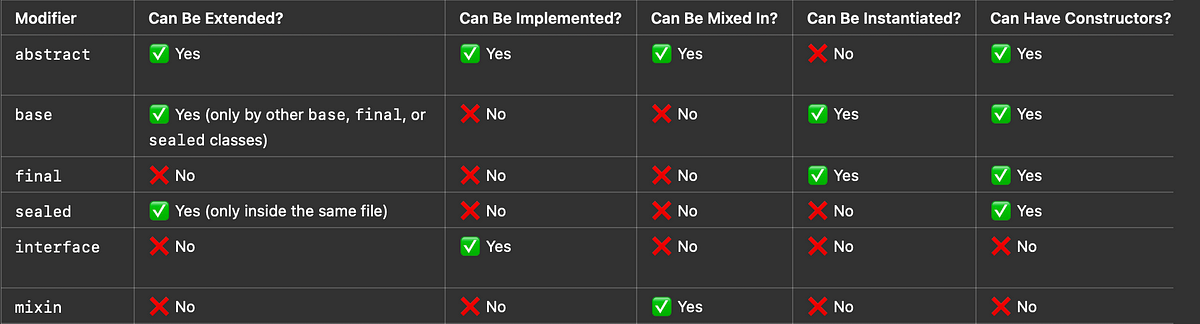
Dart’s class modifiers provide fine-grained control over inheritance, implementation, and code reuse. Here’s a quick summary of when to use each one:
• Use abstract for defining base classes with partial implementations.
• Use base to restrict extension to only base, final, or sealed classes.
• Use final when you want to prevent subclassing altogether.
• Use sealed when restricting subclassing within the same file is required.
• Use interface to enforce method contracts without inheritance.
• Use mixin for code reuse without instantiation.
• Use mixin class when you need both mixin behavior and instantiation.
By leveraging these modifiers effectively, you can improve code structure, reduce duplication, and enhance reusability in Flutter applications. Whether designing complex UI components, managing state efficiently, or enforcing architectural rules, choosing the right class modifier is key to writing better Dart code.
Now that you have a solid grasp of Dart class modifiers, how are you planning to use them in your next Flutter project? 🚀