Deep Dive into Flutter’s UI Trees: Widget, Element, and RenderObject
Free link for readers


Free link for readers
Flutter, a popular cross-platform framework for building applications, employs a unique architecture for rendering its user interface. Understanding the relationship between the Widget, Element, and RenderObject trees is crucial for optimizing performance and building complex UIs. This document aims to provide an in-depth explanation of these trees, their roles, and how they interact.
1. The Widget Tree: The Blueprint
At the highest level, the Widget tree is a hierarchical structure that describes the desired state of the user interface. Think of it as the blueprint or the configuration of your UI. Widgets are the fundamental building blocks of a Flutter application. They are lightweight, immutable objects that define the properties and structure of UI elements.
1.1 What are Widgets?
Widgets are the declarative descriptions of UI components. They are not the actual visual elements that are displayed on the screen. Instead, they provide the instructions for creating and configuring those visual elements.
- Declarative Nature: Flutter’s UI is built using a declarative approach. This means that you describe what you want the UI to look like, and Flutter takes care of how to render it. Widgets are central to this declarative paradigm.
- Immutability: A key characteristic of widgets is that they are immutable. Once a widget is created, its properties cannot be changed. If any properties need to be updated, a new widget instance is created. This might seem inefficient at first, but Flutter’s framework is optimized to handle widget creation and destruction efficiently.
- Configuration: Widgets hold the configuration for UI elements. This configuration includes properties like size, color, text, layout, and behavior.
1.2 Types of Widgets
Flutter provides a rich set of built-in widgets, and you can also create your custom widgets. Here are the two main categories:
- StatelessWidgets: These widgets do not have any internal mutable state. Their appearance and behavior are determined solely by the configuration they receive from their parent.
class MyStatelessWidget extends StatelessWidget {
  final String message;

  MyStatelessWidget({required this.message});

  @override
  Widget build(BuildContext context) {
    return Center(
      child: Text(message),
    );
  }
}- In this example,
MyStatelessWidgetdisplays a message that is passed to it when it is created. The widget itself does not manage any state. - StatefulWidgets: These widgets maintain mutable state that can change over time, causing the UI to update. StatefulWidgets are composed of two parts: the widget itself and a separate
Stateobject.
class MyStatefulWidget extends StatefulWidget {
  @override
  _MyStatefulWidgetState createState() => _MyStatefulWidgetState();
}

class _MyStatefulWidgetState extends State<MyStatefulWidget> {
  int _counter = 0;

  void _incrementCounter() {
    setState(() {
      _counter++;
    });
  }

  @override
  Widget build(BuildContext context) {
    return Center(
      child: Column(
        mainAxisAlignment: MainAxisAlignment.center,
        children: <Widget>[
          Text('You have pushed the button this many times:'),
          Text(
            '$_counter',
            style: Theme.of(context).textTheme.headlineMedium,
          ),
          ElevatedButton(
            onPressed: _incrementCounter,
            child: Text('Increment'),
          ),
        ],
      ),
    );
  }
}
This example, MyStatefulWidget, displays a counter that can be incremented by pressing a button. The _counter variable is part of the _MyStatefulWidgetState object, which manages the state of the widget. The setState() method is crucial here. It's called to notify the framework that the state has changed, which triggers a UI update.
1.3 Building the Widget Tree
The build() method is at the heart of every widget. It is responsible for constructing the widget's UI description, which is also a widget. This method returns a new widget (or a tree of widgets) that represents the UI.
Flutter builds the widget tree by calling the build() method of the root widget and then recursively calling the build() methods of its children. This process continues until the entire tree is constructed.
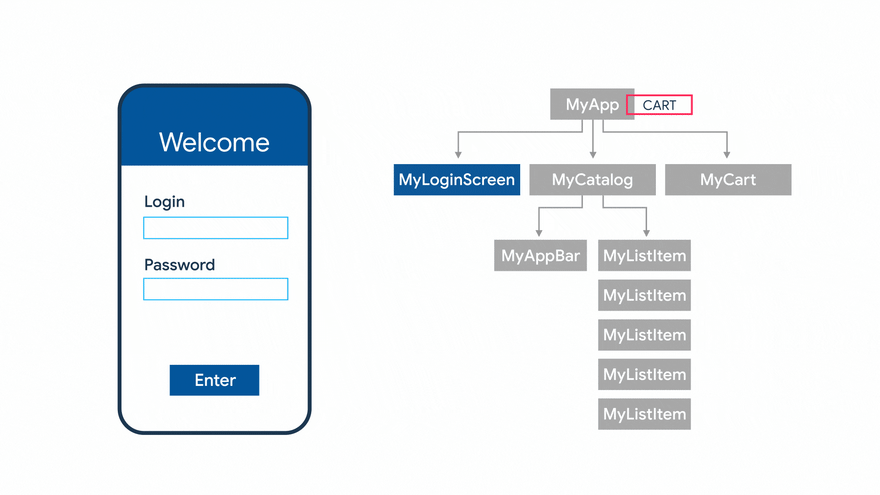
For example, a simple app might have a widget tree like this:
MaterialApp
  -> Scaffold
    -> AppBar
      -> Text ('My App')
    -> Center
      -> Column
        -> Text ('Hello')
        -> Text ('World')
2. The Element Tree: The Runtime Representation

The Element tree is a representation of the widget tree at runtime. It’s a mutable tree that manages the lifecycle of widgets and their corresponding RenderObjects. Each widget in the widget tree has a corresponding element in the element tree.
2.1 What are Elements?
Elements are the intermediaries between widgets and the underlying rendering system. They are responsible for:
- Managing the Lifecycle: Elements manage the creation, updating, and disposal of widgets and RenderObjects.
- Maintaining State: For stateful widgets, the
Stateobject is actually held by the element. This is a crucial point: the state persists across widget rebuilds because it's associated with the element, not the widget. - Driving Updates: Elements determine when the UI needs to be updated based on changes in the widget tree.
- Connecting to RenderObjects: Each Element is associated with a RenderObject, which is responsible for the actual rendering.
2.2 Types of Elements
Flutter has different types of elements, each corresponding to a specific type of widget:
- RenderObjectElement: This is the most common type of element. It manages widgets that have a corresponding RenderObject (which is most of the visual widgets).
- ComponentElement: This is the base class for elements that manage other elements. Both
StatefulElementandStatelessElementinherit from this. - StatefulElement: Manages a
StatefulWidgetand its associatedStateobject. - StatelessElement: Manages a
StatelessWidget.
2.3 The Role of Elements in Updates
Elements play a critical role in Flutter’s efficient update mechanism. When a widget changes (e.g., when setState() is called), Flutter doesn't rebuild the entire UI. Instead, it uses the element tree to determine which parts of the UI need to be updated.
Here’s a simplified explanation of the update process:
- Widget Rebuild: When the state changes, Flutter calls the
build()method of the relevant widget, creating a new widget instance. - Element Comparison: The element compares the new widget with the old widget it holds.
- Update or Rebuild: If the new widget is the same type and has the same
keyas the old widget, the element updates itself and tells its associated RenderObject to update its properties. The key is very important for Flutter to identify the correct element. If the new widget is a different type or has a differentkey, the element is marked for disposal, and a new element is created to manage the new widget. This can be more expensive, as it may involve creating new RenderObjects. - RenderObject Update: The RenderObject updates its visual representation based on the new configuration.
This process allows Flutter to efficiently update only the parts of the UI that have changed, minimizing the amount of work required to keep the UI in sync with the application’s state.
2.4 Keys
As mentioned, keys play a vital role in how Flutter manages elements. A key is an optional identifier that you can assign to a widget. Keys are used by Flutter to:
- Preserve State: When a widget is moved within the widget tree (e.g., when reordering a list), keys help Flutter identify the corresponding element and preserve its state.
- Control Element Reuse: Keys allow Flutter to reuse elements even when their position in the widget tree changes.
Here’s an example of using keys:
class MyList extends StatefulWidget {
  @override
  _MyListState createState() => _MyListState();
}

class _MyListState extends State<MyList> {
  final List<String> _items = ['A', 'B', 'C'];
  void _addItem() {
    setState(() {
      _items.add('D'); // simplified, in real app, add at specific index
    });
  }
  void _moveItem(int oldIndex, int newIndex) {
     setState(() {
      if (oldIndex < newIndex) {
        newIndex -= 1;
      }
      final String item = _items.removeAt(oldIndex);
      _items.insert(newIndex, item);
    });
  }
  @override
  Widget build(BuildContext context) {
    return Column(
      children: [
        ElevatedButton(
          onPressed: _addItem,
          child: Text('Add Item'),
        ),
        ReorderableListView.builder( // Use ReorderableListView
          itemCount: _items.length,
          onReorder: _moveItem,
          itemBuilder: (context, index) {
            final item = _items[index];
            // Using a ValueKey is good for identifying list items.
            return Container(
              key: ValueKey(item), // Provide a unique key for each item.
              margin: EdgeInsets.symmetric(vertical: 8),
              color: Colors.blue[100],
              child: ListTile(
                title: Text(item),
              ),
            );
          },
        ),
      ],
    );
  }
}
In this example, each item in the list is wrapped in a Container with a unique ValueKey. This key allows Flutter to correctly identify and reorder the corresponding elements when the list is reordered, preserving their state (if any). If we did not use keys, Flutter might recreate the elements, losing any state.
3. The RenderObject Tree: The Visual Representation
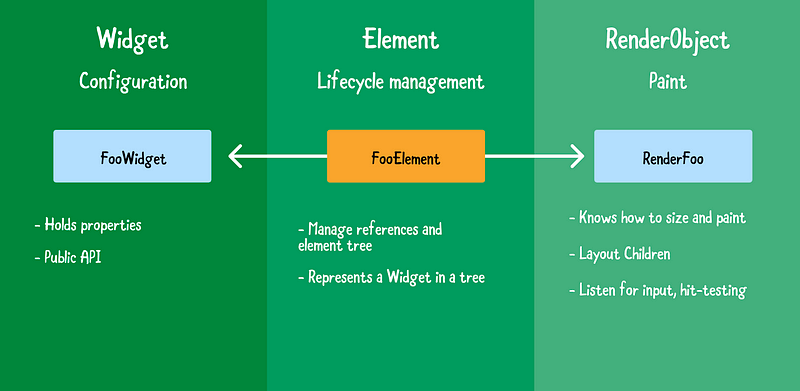
The RenderObject tree is responsible for the actual layout and painting of the UI. Each element in the element tree that represents a visual component has a corresponding RenderObject in the RenderObject tree.
3.1 What are RenderObjects?
RenderObjects are the heavy lifters of the Flutter framework. They are responsible for the following:
- Layout: Determining the size and position of UI elements.
- Painting: Drawing the UI elements on the screen.
- Composition: Organizing and combining the rendered elements.
- Interaction: Handling pointer events.
RenderObjects are part of the rendering layer, which interacts directly with the platform’s rendering engine (typically Skia). They are designed to be highly performant, as layout and painting are performance-critical operations.
3.2 RenderObject Hierarchy
RenderObjects are organized into a tree structure that mirrors the element tree. This hierarchy allows RenderObjects to participate in the layout process. For example, a parent RenderObject can define constraints (e.g., maximum size) for its children, and the children can then determine their own size and position within those constraints.
3.3 The Layout Process
The layout process in Flutter involves the following steps:
- Constraints Propagation: Constraints are passed down the tree from parent to child. These constraints specify the minimum and maximum size of each RenderObject.
- Size Determination: Each RenderObject determines its own size, taking into account the constraints from its parent and the size of its children.
- Positioning: Each RenderObject calculates its position within its parent’s coordinate system.
Flutter’s layout system is very flexible and powerful. It allows you to create complex layouts using a combination of built-in RenderObjects and layout widgets (which are themselves based on RenderObjects).
3.4 The Painting Process
Once the layout is complete, the painting process begins. During this phase, each RenderObject is responsible for drawing its visual representation on the screen.
The painting process involves the following steps:
- Painting: Each RenderObject paints itself onto a
Canvas. TheCanvasprovides a drawing API for drawing shapes, text, images, and other visual elements. - Composition: The results of the painting process are then composed together to create the final image that is displayed on the screen. This may involve layering, transparency, and other visual effects.
Flutter uses the Skia graphics library to perform the actual painting. Skia is a high-performance 2D graphics library that is used by many other applications and frameworks.
3.5 Example: A Simple RenderObject
While you rarely work directly with RenderObjects, it’s helpful to understand how they work. Here’s a simplified example of how a RenderObject might paint itself:
import 'package:flutter/rendering.dart';
import 'package:flutter/material.dart';

class MyRenderObject extends RenderBox {
  Color _color;
  MyRenderObject(this._color);
  @override
  void performLayout() {
    // Determine the size of the RenderObject.
    size = constraints.constrain(Size(100, 100)); // Example: Fixed size of 100x100
  }
  @override
  void paint(PaintingContext context, Offset offset) {
    // Get the canvas from the painting context.
    final Canvas canvas = context.canvas;
    // Create a paint object with the desired color.
    final Paint paint = Paint()..color = _color;
    // Draw a rectangle with the specified color and size.  The offset is the
    // position of this RenderObject relative to its parent.
    canvas.drawRect(offset & size, paint); // Use the & operator to combine offset and size.
  }
}
class MyWidget extends LeafRenderObjectWidget {
  final Color color;
  MyWidget(this.color);
  @override
  RenderObject createRenderObject(BuildContext context) {
    return MyRenderObject(color);
  }
  @override
  void updateRenderObject(BuildContext context, MyRenderObject renderObject) {
    renderObject._color = color;
  }
}
void main() {
  runApp(
    MaterialApp(
      home: Scaffold(
        body: Center(
          child: MyWidget(Colors.blue), // Use the custom widget.
        ),
      ),
    ),
  );
}
In this example:
MyRenderObjectis a custom RenderObject that paints a colored rectangle.performLayout()determines the size of the rectangle.paint()draws the rectangle on the canvas.MyWidgetis a widget that creates and configures theMyRenderObject.- The
LeafRenderObjectWidgetis a base class for widgets that directly create a RenderObject. - The
updateRenderObjectmethod is called when the widget is rebuilt with new properties. This allows the element to update the RenderObject's properties without creating a new RenderObject.
This example demonstrates the basic principles of how RenderObjects work, though in practice, you would typically use Flutter’s built-in RenderObjects and layout widgets.
4. The Interplay Between the Trees
The Widget, Element, and RenderObject trees work together to create and update the user interface in a Flutter application. Here’s a summary of their relationship:
- Widget Tree: The widget tree is the declarative description of the UI. It defines the structure and properties of the UI elements.
- Element Tree: The element tree is the runtime representation of the widget tree. It manages the lifecycle of widgets and their corresponding RenderObjects. Elements are the intermediaries.
- RenderObject Tree: The RenderObject tree is responsible for the actual layout and painting of the UI. RenderObjects perform the calculations and drawing.
When the UI needs to be updated, the following process occurs:
- State Change: A state change occurs (e.g.,
setState()is called). - Widget Rebuild: The
build()method of the relevant widget is called, creating a new widget instance. - Element Update: The element compares the new widget with the old widget. If the widget can be updated, the element updates itself and tells its RenderObject to update. If the widget cannot be updated (e.g., it’s a different type), the element is replaced with a new element.
- RenderObject Update: The RenderObject updates its visual representation based on the changes.
- Painting: The RenderObject paints itself on the screen.
5. Optimizing Performance
Understanding the interaction between these trees is crucial for optimizing Flutter applications. Here are some key takeaways:
- Minimize Widget Rebuilds: Since widget rebuilds can trigger element updates and potentially RenderObject updates, it’s important to minimize unnecessary rebuilds. Techniques for minimizing rebuilds include:
- Using
constconstructors for widgets that don't change. - Using
StatefulWidgetonly when necessary. - Using
shouldRebuildin customListDelegate - Using
InheritedWidgetandValueListenableBuilder - Use Keys Effectively: Keys allow Flutter to identify and reuse elements, which can improve performance, especially when dealing with lists or animations.
- Optimize RenderObjects: While you rarely work directly with RenderObjects, understanding their role can help you avoid performance bottlenecks. For example, avoid performing complex calculations in the
paint()method. - Profile Your App: Use the Flutter Performance view and timeline to identify performance bottlenecks and optimize your code.
By understanding the Widget, Element, and RenderObject trees, you can write more efficient Flutter code and create high-performance applications.